C++
Table of contents
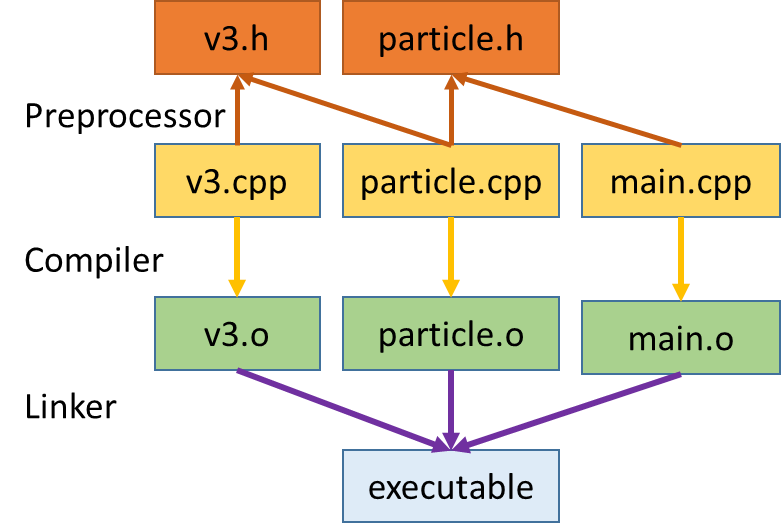
How C++ works
Warning
This section should hopefully just serve as a refresher to you. If you are completely new to C++ / C, please talk to us so we can direct you to more resources.
C++ is a high level programming language. A computer’s CPU is incapable of speaking C++. The limited set of instructions that a CPU can understand directly is called machine code.
Programs written in high level languages must be translated into machine code before they can be run. There are two primary ways this is done: compiling and interpreting. C++ is a compiled language, meaning that it has to be compiled.
Hello world
It’s not a programming language if doesn’t allow to print “Hello World”. The very first C++ program that we will look at is one that prints this simple text to the terminal.
Create a new file called hello.cpp (try to use the terminal for this), and write the following code:
#include <iostream>

int main(){
  std::cout << "Hello World from VNAV 2023!\n";
  return 0;
}
Let’s have a closer look to the code. On the first line, we include the iostream header file. Header files are mechanisms in C++ through which definitions of functions and classes are exposed to different programs. The first character is the # symbol, which is a marks the statement to the preprocessor. Each time you start your compiler, the preprocessor reads through the source code, looking for lines that begin with the pound symbol (#), and acts on those lines before the compiler runs. The angle brackets around the filename tell the preprocessor to look in all the usual places for this file. If your compiler is set up correctly, the angle brackets will cause the preprocessor to look for the file iostream.h in the directory that holds all the header files in your system. Note that the header file name does not have any extension, this is true for all of the Standard Library header files. The header iostream (Input-Output-Stream) is used by std::cout, which assists with writing to the screen (console output).
Line 3 begins the actual program with a function named int main(). Every C++ program has a main() function, it in facts marks the entry point of the program. When the program starts, main() is called by the operating system. Like all functions, the main must state what kind of value it will return. The return value type for main() in int, which means that this function will a status code. All ANSI-compliant programs declare main() to return an int. This value is “returned” to the operating system when your program completes. Some programmers signal an error by returning the value 1 and success with 0.
All blocks begin with an opening brace ({) and end with a closing brace (}). The main part of our program happen on line 4. The object std::cout is used to print a message to the standard output (i.e. the terminal), you will use the std::cout a lot. Here’s how std::cout is used: type the word std::cout, followed by the output redirection operator (<<). Whatever follows the output redirection operator is written to the screen. If you want a string of characters written, be sure to enclose them in double quotes (").
The final two characters, \n, tell cout to put a new line after the words Hello World! This special code is explained in detail when cout is discussed on Day 17.
Keep in mind.
Around the web you will commonly find using namespace std; to avoid std::. Setting the global namespace is a pretty bad practice, try to avoid it.
To run this program, we must first compile it using a C++. We will be using the C++ compiler in the GNU Compiler Collection. In your terminal run
g++ -std=c++11 -Wall -pedantic -o hello hello.cpp
we are saying to the compiler to enable the C++11 standard (-std=c++11), report all warnings (-Wall) and to strictly adhere to the standard (-pedantic). The output file will be called hello.
If everything works out fine (and it should) you can run your first C++ application!
$ ./hello
Hello World from VNAV 2023!
Standard vector
Let’s move to something more, the standard vector. Vector is a template class that implements a variable length array. It allows the same natural syntax that is used with plain arrays but offers a series of services that free the C++ programmer from taking care of the allocated memory and help operating consistently on the contained objects.
The first step using vector is to include the appropriate header:
#include <vector>
There are multiple ways to initialize a vector, the simplest is the following:
std::vector<T> vect;
This widely used notation, T stands for any data type, built-in, or user-defined class. The vector will store the Ts in a contiguous memory area that it will handle for us, and let us access the individual T simply by writing vect[0], vect[1], and so on, exactly like we would do for a C-style array.
Another very useful way to initialize it is the following
std::vector<T> histo(int size, T initial_value);
In this case we are saying to create a vector of size-elements, each initialized with the value initial_value.
Keep in mind.
You can access the vector elements with the square brackets but this will not check if the index is out of bound, it is better to use the at method, e.g. v.at(0) since it will throw an exception if the index is out of bound.
If we do not pre-initialize the vector we must add elements one by one. To add at the end of the vector we can use the push_back(T elem) method. For example we can declare a vector of integers and fill it with 5 random number in the interval 0-99:
// Create a vector containing integers
std::vector<int> vec;

// Fill the vector with random number in [0, 99]
for (auto i = 1; i <= 5; ++i){
  vec.push_back(rand() % 100);
}
The current size of the vector can be retrieved with the method size()
std::cout << "Vector size: " << vec.size() << std::endl;
The information can be used to access all the elements of the vector:
for(int i = 1; i < vec.size(); ++i){
  std::cout << vec.at(i) << " ";
}
We could have done it in a slight better way (exploiting C++11 feature) using the ranged-based for loops:
for (auto &elem: vec){
    std::cout << elem << " ";
}
Note two important things:
- We used the keyword
auto. For variables, specifies that the type of the variable that is being declared will be automatically deduced. Use it whenever it is clear to understand the type since it allows several optimization from the compiler. - We used the operator
&before the name of the variable. This marks the variable as reference to the original value and therefore avoids the copy of the element.
The complete code that declare, initialize and print a vector is listed below
#include <cstdlib> // required for rand
#include <iostream>
#include <vector>

int main(){
  // initialize rand with constant seed for reproducibility
  std::srand(314159);

  // Create a vector containing integers
  std::vector<int> vec;

  // Fill the vector with random number in [0, 99]
  for (auto i = 1; i <= 5; ++i)
    vec.push_back(rand() % 100);

  // Print number of elements in the vector to screen
  std::cout << "Vector size: " << vec.size() << std::endl;

  // Print all elements to screen
  std::cout << "Vector elements: ";
  for (auto &elem: vec)
    std::cout << elem << " ";
  std::cout << std::endl;

  return 0;
}
If you compile and run this code you will see something like
$ ./ex1
Vector size: 5
Vector elements: 19 10 47 39 39
Classes
C++ is an object-oriented programming language. The main entity of objects are classes. You can think of a class like it was a new data type (like int or double) containing several variables (of different types, called members) and some functions (called methods).
For example you can think to a new type called Circle. A circle has a radius (an intrinsic property), and several functions apply to a circle like computing the circumference and the area.
Declaring a class is very easy
class Circle{};
With the simple statement we create a class named Circle. Being a new data type we can instantiate a class in the same way we instantiate an integer
Circle c;
The class so far is not very useful, it does not contain any members or methods. To add the member radius we need to change the declaration of the class
class Circle{
  double radius;
}
Now we have a member but if you try to modify the value you will discover that you cannot: this happens because by default members are declared private, so nobody expect the class methods can change its value. To set the value we need a class constructor. The class constructor is simply a method (without return value) with the same name of the class
class Circle{
  double radius;
  public:
    Circle(double rad){
      radius = rad;
    }
}
As you see now we declared the constructor under the public keyword. It is called access specifier and says who can access members and methods.
Moreover.
We can also declare a member to be public, and in this case it would have been a good idea. In strict object-oriented programming this is usually avoided because if we allow the user to directly change the class properties we lose the opportunity to perform any book-keeping on the class itself (e.g. maybe we have to update other properties when we change the radius of the circle).
Using the same approach of the constructor we can add two more methods: double circumference() and double area()
#include <cmath> // required for pow and M_PI
#include <iostream>

class Circle{
  double radius;
  public:
    Circle(double r) {
      radius = r;
    }
    double circumference(){
      return 2*M_PI*radius;
    }
    double area(){
      return M_PI*std::pow(radius,2);
    }
};

int main(){
  Circle circ(3);
  std::cout << "Circumference: " << circ.circumference() << std::endl;
  std::cout << "Area: " << circ.area() << std::endl;
  return 0;
}
If you compile and run the code above, you should see something like:
$ ./ex2
Circumference: 18.8496
Area: 28.2743
Eigen
Now that we’ve covered some of the basics syntax of C++, it’s time to take a look at some of the existing libraries out there that will help us throughout this course. Eigen, a fast header-only linear algebra library, is the one we will try out right now. To install Eigen, it is very simple:
sudo apt install libeigen3-dev
What this command does is that it will download all relevant Eigen header files to a folder that will be searched by compilers. In the case of Ubuntu, Eigen’s header files will be downloaded to /usr/include/eigen3 or /usr/local/include/eigen3.
Here’s an example from Eigen’s documentation that will get you started:
#include <iostream>
#include <Eigen/Dense>

int main()
{
  Eigen::MatrixXd m(2,2);
  m(0,0) = 3;
  m(1,0) = 2.5;
  m(0,1) = -1;
  m(1,1) = m(1,0) + m(0,1);
  std::cout << m << std::endl;
}
Let’s take a look at this example line-by-line. First, we include the <iostream> header for printing to our terminal, which should be familiar to you now. Next, we include the <Eigen/Dense> header, which defines member functions and types that work with dense matrices. <Eigen/Dense> is one of the many modules Eigen provides. If you are interested in learning more, please check out this page.
In the main function, we first declare a variable called m of type Eigen::MatrixXd. The Eigen:: part represents the namespace in which Eigen’s functions and types live. MatrixXd represents a matrix of arbitrary size (notice the X in MaxtriXd), and each entry in the matrix is of type double (hence the d in MatrixXd). We use MatrixXd’s constructor to set the matrix to be 2-by-2. We then use the () operator to set all entries. As usual in computer science, the index of the first entry is 0, instead of 1. The final line in the main function prints the matrix to the standard output stream.
To compile it, assuming it’s saved in a file named eigen-example.cpp, you simply need to run:
g++ -o eigen-example eigen-example.cpp
You should see the following after executing the code above:
$ ./eigen-example
  3  -1
2.5 1.5
Where to go now
C++ is a complex language with many interesting features, we encurage you take a look at the following resources if you want to dive deeper: