ROS Intro
Table of contents
- ROS Nodes and Topics
- Anatomy of a ROS node
- Launch files
- Transforms (tf2_ros package)
- Quick overview of tf tools
- ROS file system structure
- Additional resources
ROS Nodes and Topics
One of the primary purposes of ROS is to facilitate communication between the ROS modules called nodes. Those nodes can be executed on a single machine or across several machines, obtaining a distributed system. The advantage of this structure is that each node can control one aspect of a system. For example you might have several nodes each be responsible of parsing row data from sensors and one node to process them.
ROS nodes
Nodes are regular processes, but they run a discovery process under the hood that allows them to find and communicate with other nodes on the network. The ROS design idea is that each node is an independent module that interacts with other nodes using the ROS communication capability. We will start by getting comfortable with running precompiled ROS nodes. Later, we will start writing our own nodes from scratch.
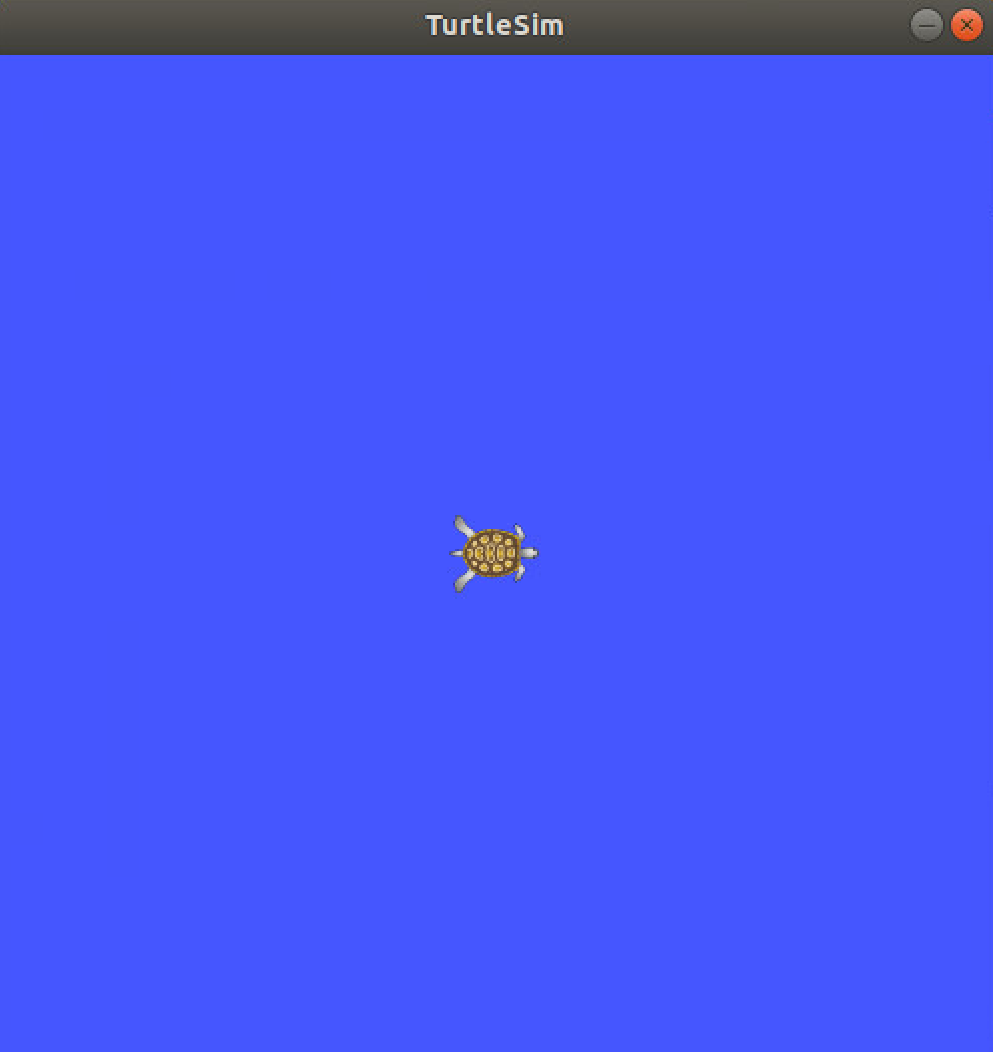
As example let’s run the turtlesim node. In a new terminal run
ros2 run turtlesim turtlesim_node
Yous should see something like
Now, you can see the running nodes with
$ ros2 node list
/turtlesim
Now, let’s run another node to control the turtle:
ros2 run turtlesim turtle_teleop_key
You can use the arrow keys in this terminal to move the turtle around. Now the list of node changed:
$ ros2 node list
/teleop_turtle
/turtlesim
ROS topics
Topics are the means used by nodes to transmit data, it represents the channel where messages are sent and it has a message type attached to it (you cannot send different types of messages in a topic). In ROS, data production and consumption are decoupled, this means that a node can publish message (producer) or subscribe to a topic (consumer).
Let’s use rqt_graph which shows the nodes and topics currently running.
ros2 run rqt_graph rqt_graph
If you select Nodes/Topics (all) from the top left you will see something similar to

In the graph the ellipses are nodes and the squares are topics. From the picture it’s easy to see that teleop_turtle is publishing to /turtle1/cmd_vel topic. The node /turtlesim is subscribed to the topic and uses the incoming messages to move the turtle.
You can also print the messages to the terminal. Try to run ros2 topic echo /turtle1/cmd_vel and move the turtle; you should get something like
$ ros2 topic echo /turtle1/cmd_vel
linear:
  x: 0.0
  y: 0.0
  z: 0.0
angular:
  x: 0.0
  y: 0.0
  z: -2.0
---
These are very useful tools to debug your nodes.
Anatomy of a ROS node
Minimal Publisher Example
A simple C++ ROS node that publishes messages has a structure similar to the following
#include <string>
#include "rclcpp/rclcpp.hpp"
#include "std_msgs/msg/string.hpp"

class MinimalPublisher : public rclcpp::Node {
  public:
    MinimalPublisher() : Node("minimal_publisher") {
      publisher_ = this->create_publisher<std_msgs::msg::String>("topic", 10);
    }
    rclcpp::Publisher<std_msgs::msg::String>::SharedPtr publisher_;

    void run() {
        auto message = std_msgs::msg::String();
        size_t count = 0;
        rclcpp::Rate r(1);
        while (rclcpp::ok()) {
            message.data = "Hello, world! " + std::to_string(count++);
            publisher_->publish(message);
            r.sleep();
        }
    }
};

int main(int argc, char * argv[]) {
  rclcpp::init(argc, argv);
  MinimalPublisher pub;
  pub.run();
  rclcpp::shutdown();
  return 0;
}
Let’s analyze it line by line:
#include <string>
#include "rclcpp/rclcpp.hpp"
#include "std_msgs/msg/string.hpp"
adds the header rclcpp/rclcpp.hpp containing all the basic ROS functionality.
Next we define our minimal publisher class:
class MinimalPublisher : public rclcpp::Node {
  public:
    MinimalPublisher() : Node("minimal_publisher") {
      publisher_ = this->create_publisher<std_msgs::msg::String>("topic", 10);
    }
    rclcpp::Publisher<std_msgs::msg::String>::SharedPtr publisher_;
Note that the class inherits from rclcpp::Node. All of your nodes will need to inhertic from this class to be able to publish or subscribe messages. The node is initialized with the node name minimal_publisher, and a publisher is instantiated with create_publisher which publishes std_msgs::msg::String message type on a topic called topic.
Next, we define the run function, a loop which will periodically publish a “Hello, world!” message.
    void run() {
        auto message = std_msgs::msg::String();
        size_t count = 0;
        rclcpp::Rate r(1);
        while (rclcpp::ok()) {
            message.data = "Hello, world! " + std::to_string(count++);
            publisher_->publish(message);
            r.sleep();
        }
    }
};
rclcpp::Rate defines a rate in hz, and calling r.sleep at the end of our loop ensures that the loop runs at 1 hz. rclcpp::ok() evaluates to true as long as the node has not been shut down. Finally, calling publisher_->publish(message) sends the messages on the publisher’s topic.
To actually publish messages, we need to instantiate the node and call its run method:
int main(int argc, char * argv[]) {
  rclcpp::init(argc, argv);
  MinimalPublisher pub;
  pub.run();
  rclcpp::shutdown();
  return 0;
}
rclcpp::init needs to be called to initialize ROS, and rclcpp::shutdown will ensure ROS is properly cleaned up at the end.
Minimal Subscriber Example
Next we will take a look at example code for a minimal subscriber node, which receives messages from the above publisher node:
#include <string>
#include "rclcpp/rclcpp.hpp"
#include "std_msgs/msg/string.hpp"

class MinimalSubscriber : public rclcpp::Node {
  public:
    MinimalSubscriber()
    : Node("minimal_subscriber") {
      subscriber_ = this->create_subscription<std_msgs::msg::String>(
            "topic", 10,
            std::bind(&MinimalSubscriber::topic_callback, this, std::placeholders::_1));
    }
    rclcpp::Subscription<std_msgs::msg::String>::SharedPtr subscriber_;

    void topic_callback(const std_msgs::msg::String& msg) const {
        RCLCPP_INFO(this->get_logger(), "I heard: '%s'", msg.data.c_str());
    }
};

int main(int argc, char * argv[]) {
  rclcpp::init(argc, argv);
  rclcpp::spin(std::make_shared<MinimalSubscriber>());
  return 0;
}
The structure is very similar, but there are a couple of differences that are worth highlighting. First,
      subscriber_ = this->create_subscription<std_msgs::msg::String>(
        "topic", 10, std::bind(&MinimalSubscriber::topic_callback, this, std::placeholders::_1));
This creates a subscription to the topic called topic, with a queue size of 10 messages. The third argument specifies a callback function that should be run when a new messages is received on the topic. In this case, we use std::bind (an example of partial function application) to specify that the callback function should be the topic_callback member function of the current MinimalSubscriber class object.
It is also worth pointing out
  rclcpp::spin(std::make_shared<MinimalSubscriber>());
  return 0;
rclcpp::spin will not return until the subscriber node exits or ROS is killed, letting the node process callbacks as long as ROS is running.
Launch files
Launch files are the preferred way to run ROS nodes. The launch files provide a convenient interface to execute multiple nodes, as well as other initialization requirements such as parameters.
Launch files can be written in Yaml, XML, or Python. We would suggest using YAML. Usually the launch files are located in the launch folder of the package. If the package provides one you can use roslaunch to use it:
ros2 launch <package_name> <launch_file>
Note: Pushing CTRL+c in a terminal with a launch file running will close all nodes that were started with that launch file.
An example of launch file is
launch:

- node:
    pkg: minimal_test
    exec: publisher_node
    name: pub_node
    namespace: my_robot

- node:
    pkg: minimal_test
    exec: subscriber_node
    name: sub_node
    remap:
    -
        from: "topic"
        to: "/my_robot/topic"
which will run two nodes. Here we introduce the concept of a namespace; in this case the publisher node’s name will be /my_robot/pub_node and all of the node’s topic names will have the form /my_robot/<original topic name>. We also introduce the ability to remap topics: the subscriber node listens on topic by default, and we have remapped it to listen on /my_robot/topic.
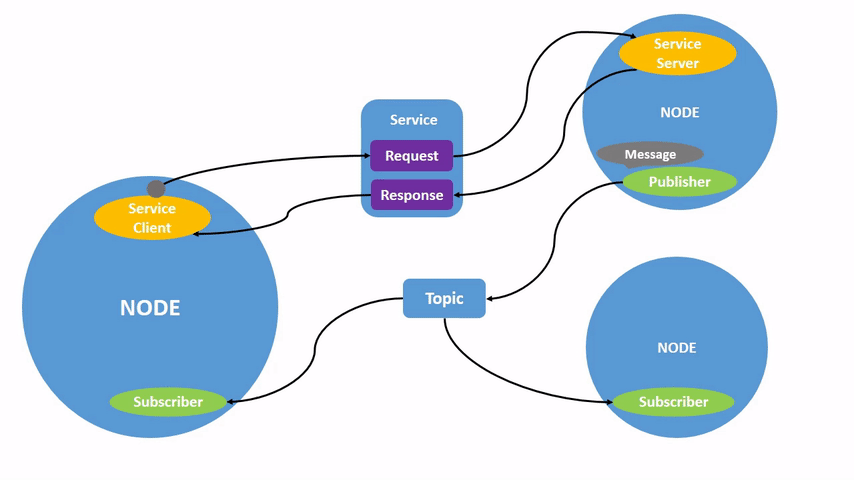
Transforms (tf2_ros package)
The ROS tf2 library has been developed to provide a standard method to keep track of coordinate frames and transform data within the entire system so that users can be confident about the consistency of their data in a particular coordinate frame without requiring knowledge about all the other coordinate frames in the system and their associations.
tf2 is distributed across nodes (across machines too, eventually) and there are two types of tf2 nodes
- Listener: that listen to
/tfand cache all data that it collected (up to cache limit) - Broadcaster: that publish transforms between coordinate frames on
/tf
In tf2, transforms and coordinate frames are represented as a graph with the transforms as edges and the coordinate frames as nodes. The advantage of this representation is that the relative pose between two nodes is simply the product of the edges connecting the two nodes. A tree structure has also the benefit of allowing for dynamic changes easily. tf indeed takes care of ambiguity of transforms not allowing loops in the transforms graph.
Where to learn TF.
The best resource to learn TF out there is the official ROS tf2 tutorials.
Take your time to familiarize with the Listener/Broadcaster code, you'll need for the exercises.
Of course do not forget the official documentation.
Quick overview of tf tools
Let’s see the tools we have to explore the tf tree.
ROS provides a simple demo we are going to use, from a terminal run
ros2 launch turtle_tf2_py turtle_tf2_demo.launch.py
and from a second terminal run
ros2 run turtlesim turtle_teleop_key
Once the turtlesim demo is started, we will drive the center turtle around in turtlesim using the keyboard arrow keys. We can observe that one turtle will continuously follow the turtle we are driving. In this demo application, the ROS TF library is used to create three coordinate frames: a world frame, a turtle1 frame, and a turtle2 frame, and to create a TF broadcaster to publish the coordinate frames of the first turtle and a TF listener to compute the difference between the first and follower turtle frames, as well as drive the second turtle to follow the first.
Using rqt_tf_tree
The rqt_tf_tree tool enables the real-time visualization of the tree of frames being broadcast over ROS
ros2 run rqt_tf_tree rqt_tf_tree
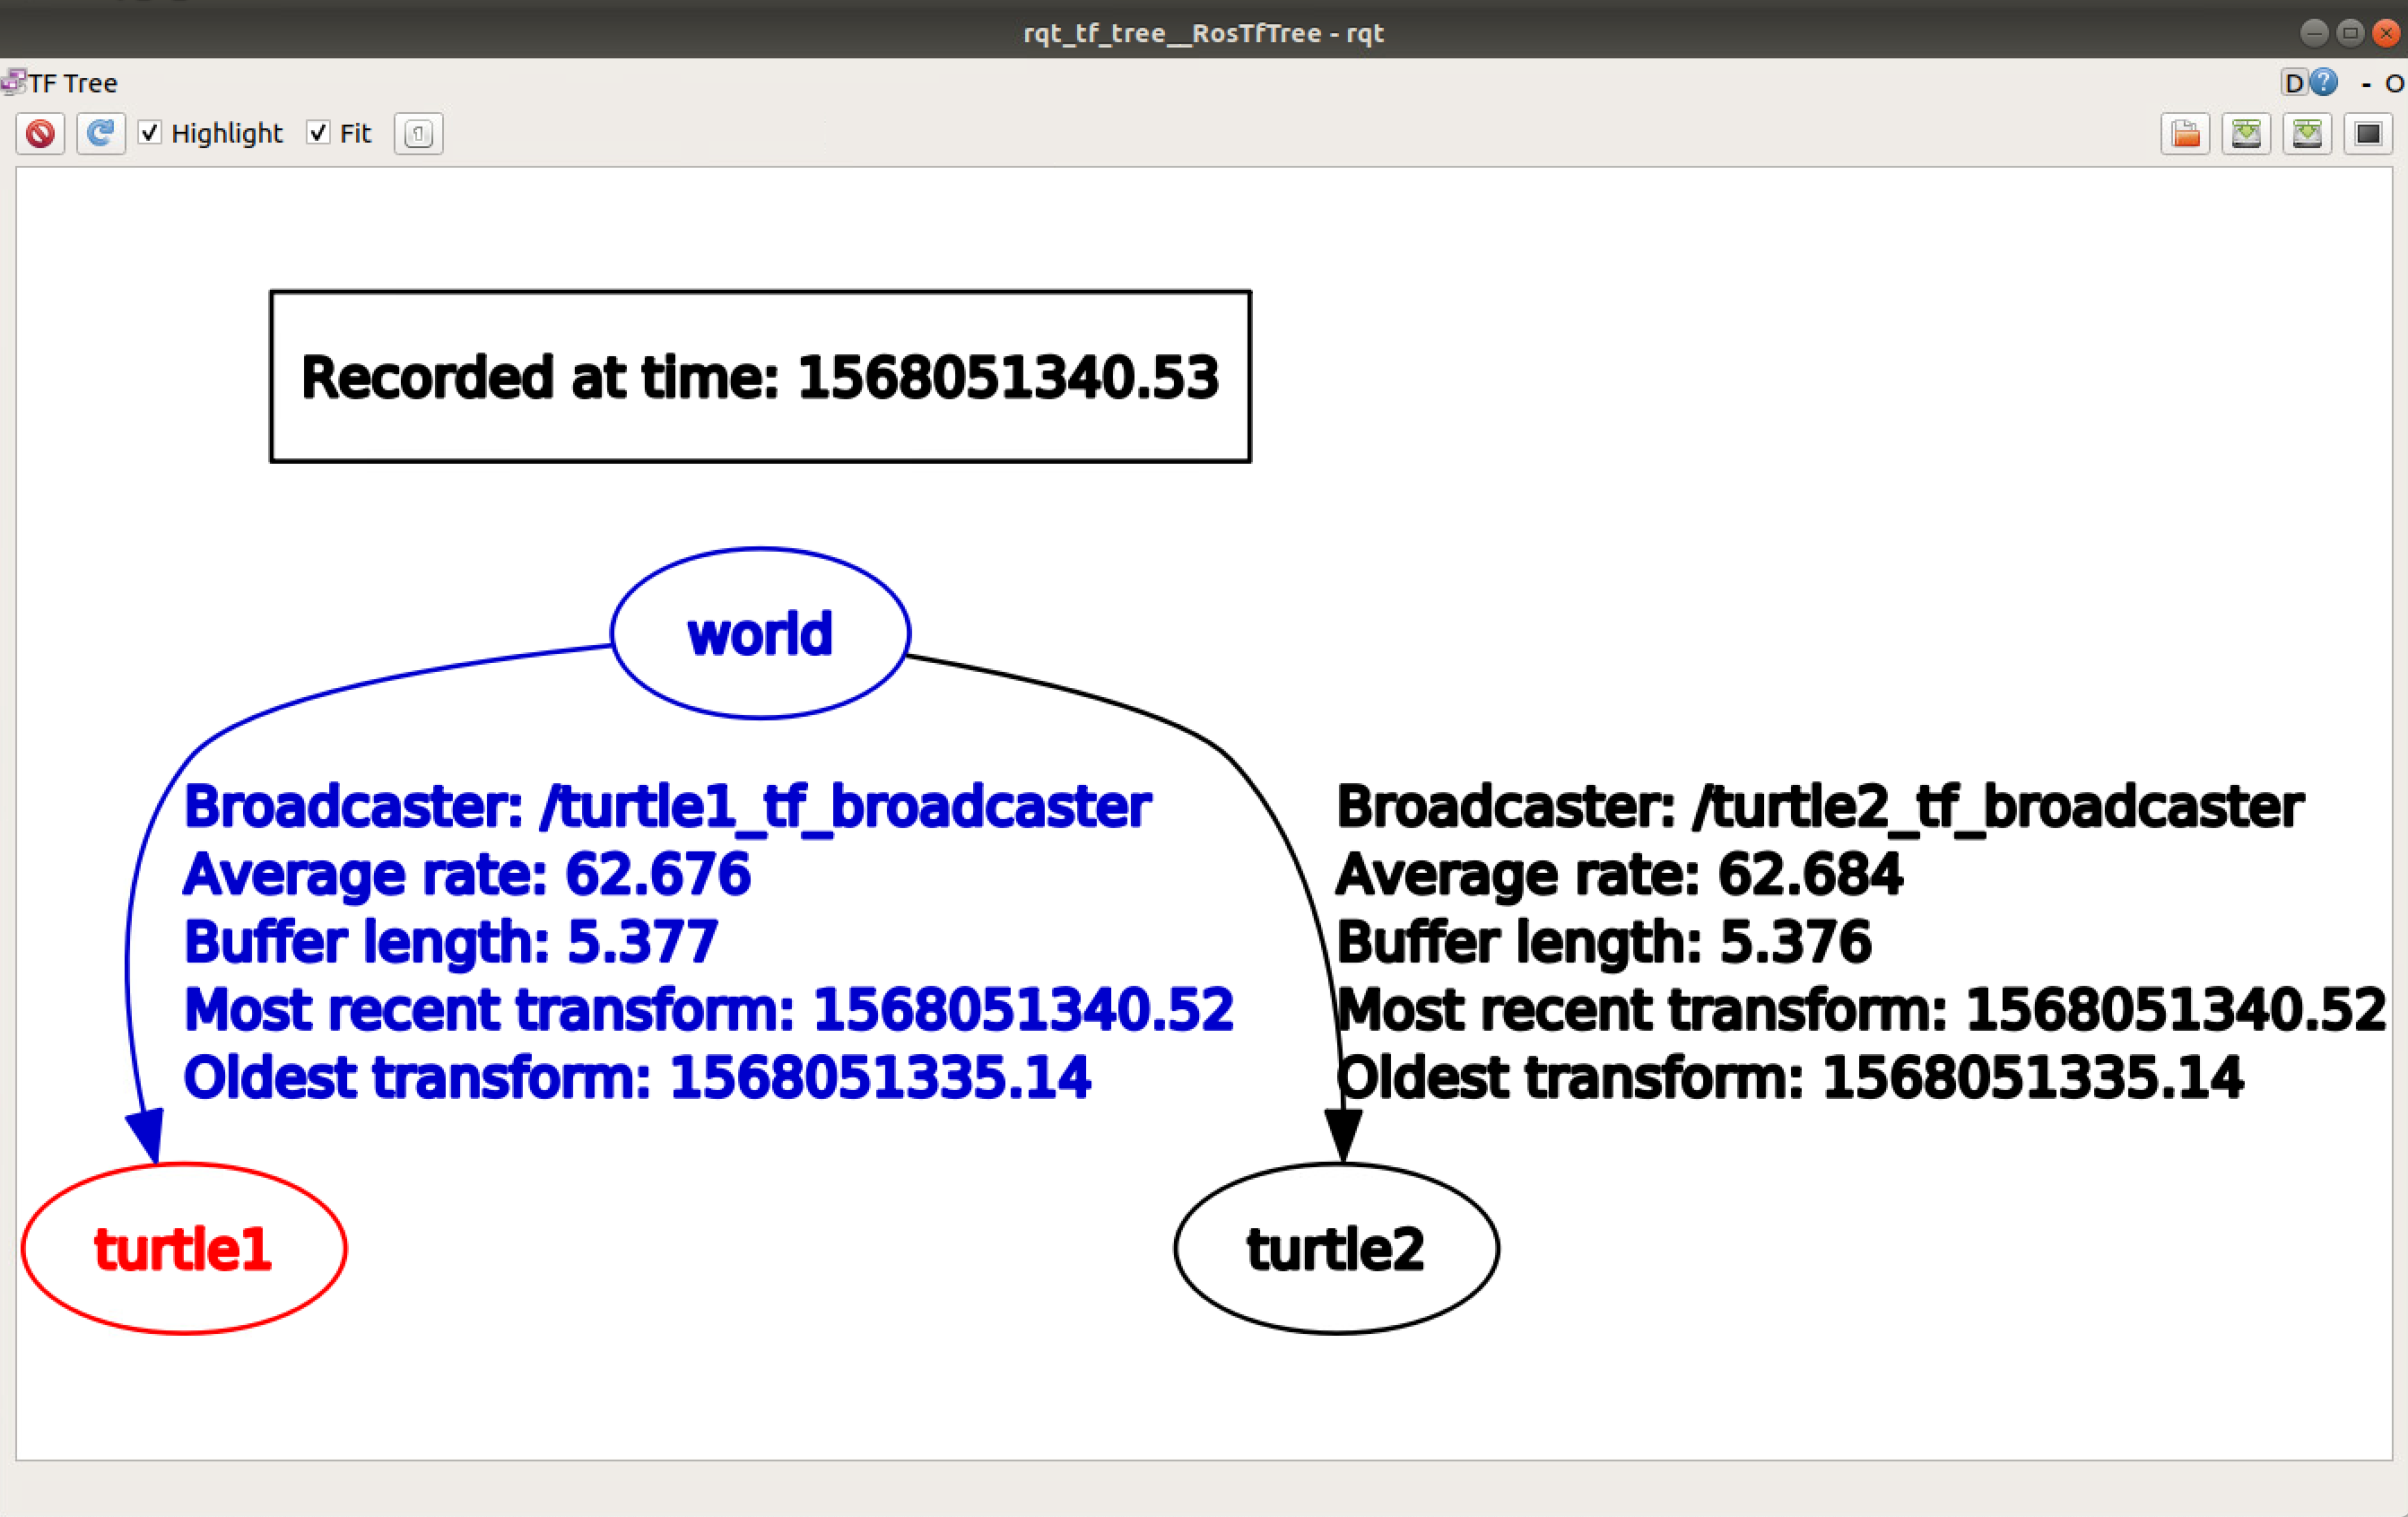
Here, you can see that three frames are broadcast by TF—the world, turtle1, and turtle2, where the world frame is the parent of the turtle1 and turtle2 frames.
Using tf2_echo
The tf2_echo tool reports the transformation between any two frames broadcast over ROS
ros2 run tf2_ros tf2_echo [reference_frame] [target_frame]
For example
$ ros2 run tf2_ros tf2_echo turtle2 turtle1
At time 1724205730.839441066
- Translation: [1.057, 0.031, 0.000]
- Rotation: in Quaternion [0.000, 0.000, 0.070, 0.998]
Using RViz
RViz is a graphical 3D visualization tool that is useful for viewing the association between TF frames within the ROS system:
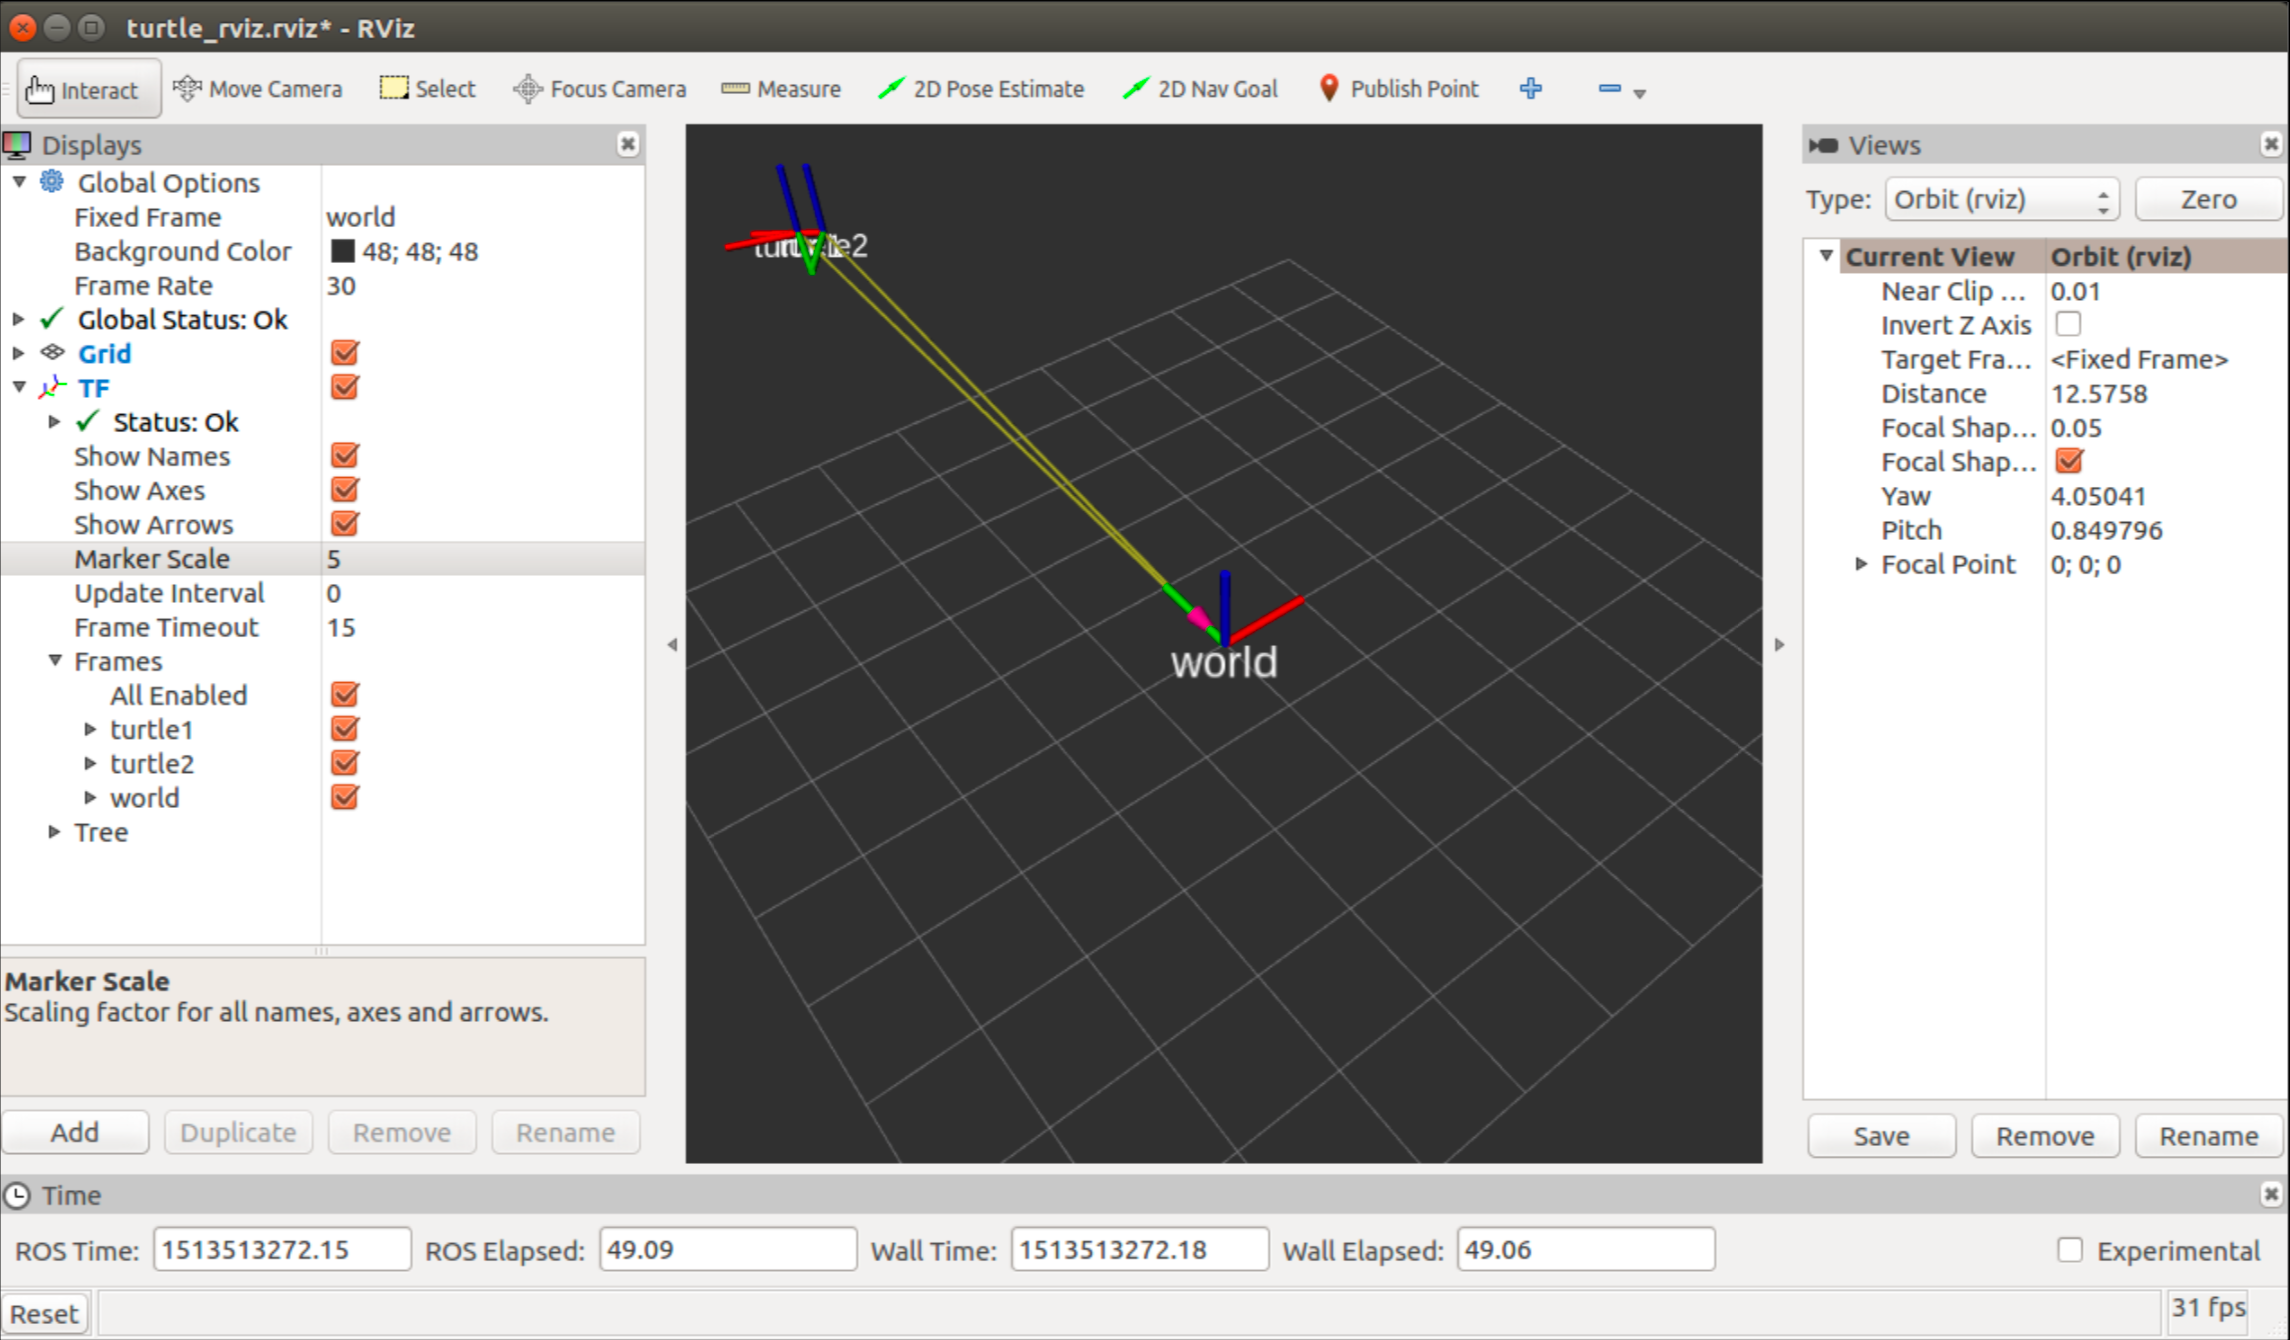
You can run RViz by running
rviz2
One it is started, you need to press the button Add to add the TF in the visualization and set the correct Fixed Frame (i.e. world).
ROS file system structure
General structure
Similar to an operating system, ROS files are also organized in a particular fashion. The following graph shows how ROS files and folder are organized on the disk:

The ROS packages are the most basic unit of the ROS software. They contain the ROS runtime process (nodes), libraries, configuration files, and so on, which are organized together as a single unit. Packages are the atomic build item and release item in the ROS software.
Inside a package we can find the package manifest file, which contains information about the package, author, license, dependencies, compilation flags, and so on. The package.xml file inside the ROS package is the manifest file of that package.
The ROS messages are a type of information that is sent from one ROS process to the other. They are regular text files with .msg extension that define the fields of the messages.
The ROS service is a kind of request/reply interaction between processes. The reply and request data types can be defined inside the srv folder inside the package.
For example, the package we will develop in this lab will be like
.
└── two_drones_pkg
    ├── CMakeLists.txt
    ├── README.md
    ├── config
    │   └── default.rviz
    ├── launch
    │   └── two_drones.launch
    ├── mesh
    │   └── quadrotor.dae
    ├── package.xml
    └── src
        ├── frames_publisher_node.cpp
        └── plots_publisher_node.cpp
The workspace
In general terms, the workspace is a folder which contains packages, those packages contain our source files and the environment or workspace provides us with a way to compile those packages. It is useful when we want to compile various packages at the same time and it is a good way of centralizing all of our developments.
Additional resources
Of course there are many details we haven’t discussed here. You can find much more detailed information in the Official ROS tutorial